A cheap and Geeky Boat hack for your Seat backs!
Okay, I'm a geek, I freely admit that. One thing I have accumulated over the years as a computer network administrator and technician is an abundance of old Hard Drives. I just never wanted to throw them out, even though they had failed or been replaced with bigger faster ones... now I know why!
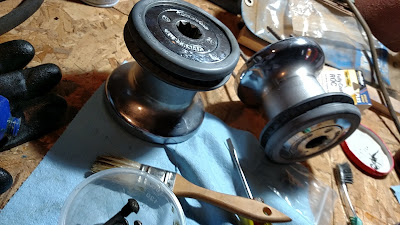
I have always liked taking things apart... even when I was very young. My mom tells a story of how I took apart a crib, with no tools, while my younger sister was sleeping in it... but that's a story for another day. I found I had the specialized driver bit for removing the star drive screws that hold the hard drives together. I found two useful things in there - Magnets and Platters. There are two powerful Magnets in each drive, and between 2 to four platters. I have figured a way to use both of these in my boat... This post focuses on using the magnets.

This post focuses on using the Magnets that control the movement of the drive head (like the needle on a Record Player for you non-geek types).
I have always HATED the "Boat Snaps" that held the seat backs in my Salon upright. The were a pain to unsnap and snap, and sometimes pulled out of the fiberglass. As I thought about a better way, I came to the conclusion that whatever I used only needs enough strength to hold them up against the bulkhead while heeling over. Hmmm... The Hard drive magnets are POWERFUL. If you make the mistake of letting them come in contact with each other, it takes a LOT of work to get them apart. Then I had an epiphany... I would replace the hated snaps by using the Magnets.... somehow.
Here is how I did it.
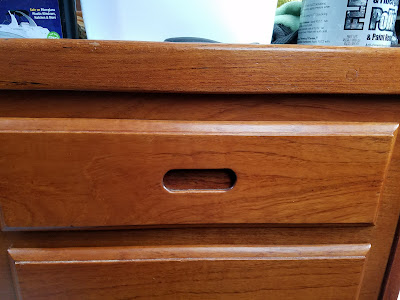
The way my seats were upolstered, there is a strip that holds the snaps connected on one long side.
On the back side of the strip, I made an incision through one layer of the vinyl material.

Then I could slip a magnet between the two layers....

Then, using a a barbeque skewer, I could push it all the way down to where the existing snap was.

Now I needed a way to keep the magnet in place, so enter my Palm Sewer. this handy device that everyone should have can sew through just about anything

The first step is to pull out a length of the waxed twine...

Then, figure out your starting position and push the needle through


Back off slightly and the twind will make a little loop like this...

Pull the twine through like this

then pull the needle back. Pull up enough twine until it exceeds the area you are going to sew by about an inch. Make sure that the twine in the bottom does the same.

Then make your first stitch... I made mine about an eighth of an inch long. after pushing all the way through, back out a bit so you get this loop again.

Feed the bottom length of twine through it, then pull tight on both ends. you want the place where they mee to be in the middle of the two layers, then repeat...


on the last stitch, pull a little more twine through, then cut making sure you have at least an inch or so of twine


then tie the ends together in a knot several times, and trim the ends


and Voila! the magnet is in it's own little pocket. Repeat for all of the magnets you want to place. I put one next to each snap.
That is half of the battle, now for the other side...
You need some thin ferrous metal (non-ferrous metal like aluminum or stainless will not stick to magnets)
I had this cover piece that was removed from a server when we installed some SAN disk arrays (did I mention I was a geek?), but any type of ferrous sheet metal will do.
I marked out some strips on the metal, then took it to my drill press and drilled a hole in the center of each strip .


Because I wanted the screw head to be as flat as possible against the metal strip, I countersunk each hole as well

Off to the workbench to do a bit of sawing with my trusty hacksaw, and I had a bunch of strips ready to install...

Back aboard Dulcinea, I removed all of the male snaps from the fiberglass. Then I marked where the strips needed to be mounted, which was easy... just stick the metal centered on the magnet, put the seatback into place then mark both sides of the metal strip. then remove the strip, put on the marks and mark the hole!


Once that is done put the seatback back into place, and CLICK! they are held into place. They work exceedingly well. Notice in the picture below that they are suspended with no cushions below them!

I have had this in place for about a year now, and it is still going strong, and i still love them! it makes it VERY easy to get to the new storage area I created behind the seat backs, which will have its own post soon!
Score one for Geeks everywhere!
'Til next time!
JEM
I have always liked taking things apart... even when I was very young. My mom tells a story of how I took apart a crib, with no tools, while my younger sister was sleeping in it... but that's a story for another day. I found I had the specialized driver bit for removing the star drive screws that hold the hard drives together. I found two useful things in there - Magnets and Platters. There are two powerful Magnets in each drive, and between 2 to four platters. I have figured a way to use both of these in my boat... This post focuses on using the magnets.

This post focuses on using the Magnets that control the movement of the drive head (like the needle on a Record Player for you non-geek types).
I have always HATED the "Boat Snaps" that held the seat backs in my Salon upright. The were a pain to unsnap and snap, and sometimes pulled out of the fiberglass. As I thought about a better way, I came to the conclusion that whatever I used only needs enough strength to hold them up against the bulkhead while heeling over. Hmmm... The Hard drive magnets are POWERFUL. If you make the mistake of letting them come in contact with each other, it takes a LOT of work to get them apart. Then I had an epiphany... I would replace the hated snaps by using the Magnets.... somehow.
Here is how I did it.
The way my seats were upolstered, there is a strip that holds the snaps connected on one long side.
On the back side of the strip, I made an incision through one layer of the vinyl material.

Then I could slip a magnet between the two layers....

Then, using a a barbeque skewer, I could push it all the way down to where the existing snap was.

Now I needed a way to keep the magnet in place, so enter my Palm Sewer. this handy device that everyone should have can sew through just about anything

The first step is to pull out a length of the waxed twine...

Then, figure out your starting position and push the needle through


Back off slightly and the twind will make a little loop like this...

Pull the twine through like this

then pull the needle back. Pull up enough twine until it exceeds the area you are going to sew by about an inch. Make sure that the twine in the bottom does the same.

Then make your first stitch... I made mine about an eighth of an inch long. after pushing all the way through, back out a bit so you get this loop again.

Feed the bottom length of twine through it, then pull tight on both ends. you want the place where they mee to be in the middle of the two layers, then repeat...


on the last stitch, pull a little more twine through, then cut making sure you have at least an inch or so of twine


then tie the ends together in a knot several times, and trim the ends


and Voila! the magnet is in it's own little pocket. Repeat for all of the magnets you want to place. I put one next to each snap.
That is half of the battle, now for the other side...
You need some thin ferrous metal (non-ferrous metal like aluminum or stainless will not stick to magnets)
I had this cover piece that was removed from a server when we installed some SAN disk arrays (did I mention I was a geek?), but any type of ferrous sheet metal will do.
I marked out some strips on the metal, then took it to my drill press and drilled a hole in the center of each strip .


Because I wanted the screw head to be as flat as possible against the metal strip, I countersunk each hole as well

Off to the workbench to do a bit of sawing with my trusty hacksaw, and I had a bunch of strips ready to install...


Once that is done put the seatback back into place, and CLICK! they are held into place. They work exceedingly well. Notice in the picture below that they are suspended with no cushions below them!

I have had this in place for about a year now, and it is still going strong, and i still love them! it makes it VERY easy to get to the new storage area I created behind the seat backs, which will have its own post soon!
Score one for Geeks everywhere!
'Til next time!
JEM

Comments
Post a Comment