At my front door, waiting to greet me when I got home from my trip was my new Tiller. I had to get it made at Rudder-Craft while I was gone... the whole process takes 2 weeks... what a coincidence, that was how long I was gone! It is beautiful! I had it done with an epoxy finish, then a varnish... basically the best package they had. and I also bought a tiller cover for it! That should take care of all of those exposure problems that caused the old one to fail.
The first thing I noticed though is that I was going to have to modify this beautifully finished product, so that it would fit in the hardware. the aft end would have to be cut to about a 60 degree angle, and when i tried to put the hardware on, I found the tiller base was about 1/4 inch too wide.... DANG!
In trying to figure out what tool to use to make the 60 degree cut, it occured to me that this might be the purfect job for my 12" sanding disc.... So I set up my Shop-Smith Mark V for the sanding disk operation. It worked like a dream! and at precisely the right angle too!
 |
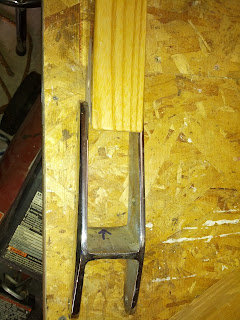
You can see the 60 degree angle and where I had to sand the
sides so the hardware would fit. |
I had to chisel and sand the sides of the tiller Base to accommodate the hardware, all the while cursing the fact that I had to ruin this perfect finish... Once I got it to where the hardware fit, then I marked the holes for the bolts to go through to secure the hardware.
The choice of tool for this operation was a no brainer... I set up the Shop-Smith in Drill Press mode, put in the correct size drill bit, lined up the hole, and Voila! Two perfectly parallel and plumb holes in no time! Next on the agenda was to Re-Protect the wood! I chose to use some 5 Minute Epoxy, spread with a plastic credit card shaped spreader. I also protected the bolt holes with 5 minute epoxy, applied with the stick of a Q-Tip... I just cut off the fuzzy part... It worked great and alllowed me to completely coat the bolt holes. After the Epoxy cured, all I had to do was secure the hardware with the bolts and we were ready to go to the boat and install it!
 |
| Ready for the Hardware! |
Installing it on the boat was a matter of 1 Bolt and about 2 minutes.. Done! New steerage!
 |
| It looks Naked! |
 |
| 1 Bolt Later.... |
 |
| Don't it look Purty? |
Now for the new Navage! of course I know that isn't a real work but it works... I am now going to install my new GPS. I feel this is a MUST, because I have a horrible sense of direction, and, After all, I am a geek, and geeks like toys!
Installing it was a piece of cake. It took me longer to figure out exactly where I was going to install it, than to do the actual installation.
- Pre drill 3 holes, check... screw in 3 screws, Check.
- Drill a hole for the electrical wire, check...
- run the wire to the electrical panel and connect to a circuit breaker, check.
- Silicone the hole the wire came through so water doesn't come in, check.
- Plug in and mount the GPS, Check. and Voila! it works!
OK... OK... there was a little more to it... the wire wasn't long enough, so I had to add some to it, but still, it was pretty simple.

Here is the Gratuitous picture of the Completed Projects in action!
 |
| Both completed projects in the center of the Picture! LOL |


Nice to see another tiller-steered boat. Not many larger than 27 feet out there these days. Most boat owners want the wheel - but the tiller is infinitely simpler, and therefore more reliable - once you install one that isn't rotten! I've had to replace one also, so that's part of ownership.
ReplyDelete