The Adventures, Projects and accomplishments of a Server Geek and Sailor
The Haul out - Part 2
Get link
Facebook
X
Pinterest
Email
Other Apps
OK, so the boat is out of the water, and time is ticking down. I have to finish everything I want to do in the smallest amount of time possible...Time on the Hard is money! Fortunately, I had only a few things that I needed to do. The rest would be done by the boatyard.
I came back on Friday, and spent most of the day cleaning the
bilge. I wanted to put a coat or two of BilgeCoat in there, but it had
to be cleaned first! As it turned out, Friday was a Gorgeous day... unlike Thursday with the high winds and rolly seas... here is a panoramic pic from the deck of my boat...
It is also odd to look forward on your boat and see it almost overhanging a road....
they Started the buffing job, I gotta say I was pretty impressed with the work that they were doing. I stopped to take the following Pic, as it shows the before and after pretty well!
Then I started work on Painting the Bilge on Saturday. I got the whole thing painted, but that was all I had time for, as I had to get to the Tacoma Musical Playhouse for "Man of La Mancha" Rehearsals.... it was the start of Hell Week, meaning that we would be rehearsing and performing for the next 8 days straight!
I almost forgot to take a "before" picture...
The "After" shot.... see those bolts? Those are what hold the 800 pound keel on...
Easy clean up.... I used a chip brush... good thing too, as I had to leave in a hurry....
On Sunday, I spent the day SCRUBBING the Hull and the edge of the deck above the Rub Rail. As the boatyard was only buffing to just below the rub rail, it made the area above it look FILTHY. Well, it was, it was just that you could see it better... This was prep work for the buffing job I know I will have to do to that area, and the deck and cockpit as well, sometime in the near future.... a few hours of that, then it was off to rehearsal! that was the last bit of work that I would be able to do on it, as the yard was DONE with all of their work by Wednesday afternoon. that would have been Buffing the rest of the Boat, sanding the bottom, and applying 2 coats of Bottom Coat. I arranged to take leave from work on Friday so I could splash the boat, and return to Foss Harbor. As I promised earlier, here are the STARTLING Before and after pictures! I am making them pretty big, but you can click on any picture to see it in full view.
This first set, is also the most Dramatic! the Prop and Shaft, and the answer to the question I asked in the last blog entry "Do you notice anything missing here?"
Prop and Shaft before.... obviously... What was missing?
And the After Pic! And notice the Zinc Anodes installed on the Shaft... THAT is what was missing! ooooooo... Shiny!
yeah... pretty ugly....
Before...
after!!!
Nice, Clean and Smooth!
Before.....
AFTER! OOOOOOOOOOOOO.... Shiny!!!
Lynn is checking out the Raw Water intake... clean as a whistle now!
Now that the work was done, it was time to put it back in the water. Reinstall the Transducer? Check! Check the the thru hulls? Check. Pay the bill? Cough... Check. Ready to go!
once back in the water and underway, I noticed a HUGE difference in the way the boat handled! It really glides through the water now using much less engine throttle to do so.... I had to cut the engine toward the end of the slips to make the right hand turn... we were moving too fast! We stopped and got some fuel, and then it was out into the East passage.... where we fought the wind, waves and tide. The tide would turn in about a half hour or so, but the wind and waves were right in our face making it slow going.... 2 - 3 Knots...
This video was shot right after getting into the east passage...
The ride was NOWHERE near the level of the trip down, thank goodness, and I had a lot more fun on this trip. It took somewhere between 2 - 3 hours to get back, and our speed picked up a bit when we got into Commencement bay.... Docking the boat was a bit different as well, with the new handling characteristics, but we got it into the slip with no problems....
Till Next Time! and feel free to leave a comment below!
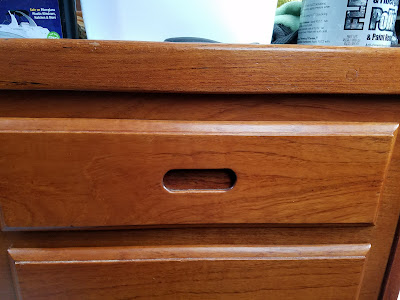
So, my friends, this post is centered around the problem I have with this drawer, located in the Galley. You see, I only have 2 drawers in the entire galley. Well.... that is because some of the drawers were removed so a refrigerator could be installed, but still, only TWO drawers. This top drawer is my silverware/knives/wine and bottle openers/other kitchen gadgets drawer. It is the second entry on this list that was my greatest concern. I was worried that one day I would reach into that drawer to get something, and come out with a gash on my hand. that is because the inside of that drawer looked like this: yeah... what a mess. the second issue is, of course it made it hard to find anything. Enter Bodum. What is that you ask? The hero of my Galley , of course! Well, OK, if that is too vague, how about a picture? Yup! It is a knife rack! I was first int...
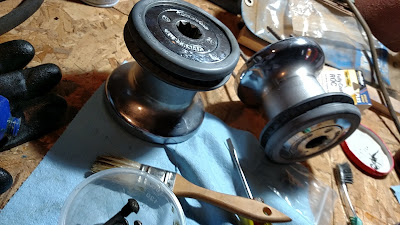
Winches.... a staple piece of hardware that sailors rely on to haul sails up, and to keep them trimmed. They can also be used to haul people up and down the mast or out of the water, and are used for many utilitarian purposes such as putting Dingys in and out of the water, and even hauling the engine out of the boat. It is NOT a piece of equipment that you want to fail at those critical times when they are under load. Yet this is possible if they don't have proper backing plates. When I went to remove all my winches so I could take them home and clean them this past winter, I found a surprise on my primary winches. I have removed the nuts from these bolts. Note how the washers have sunk into the plywood.. That's right... they had no backing plates. just some small washers. Now why is this a big deal? well, if you have ever been sailing close-hauled (the fastest point of sail) in 20 knot winds, you know that some incre...
This is the third summer I have owned Dulcinea. Every summer I have taken some sort of trip, each year doing it a little bigger, and this year I planned the longest trip I have ever taken... almost 3 weeks! Now, I am aware of the Cruisers superstition of never starting a passage on a Friday, but I reasoned that this was a vacation , not a passage , so therefore it wouldn't apply to me.... WRONG! Now, don't get me wrong, overall I had a great time, it is just that I went through some pretty rough times as well. Really? Again? Looking at Quartermaster Harbor entrance... 2 boats or more so it must be a race! But I am getting ahead of myself... This years trip was starting on Friday, August 14 and would go through Sept 2nd. This year I planned well ahead of the trip, and had all of my provisioning and loading done by Thursday, a minor miracle! Still, I didn't leave as early as I intended to (0800) and by the time...


 Then I started work on Painting the Bilge on Saturday. I got the whole thing painted, but that was all I had time for, as I had to get to the Tacoma Musical Playhouse for "Man of La Mancha" Rehearsals.... it was the start of Hell Week, meaning that we would be rehearsing and performing for the next 8 days straight!


Comments
Post a Comment