More Storage!!!
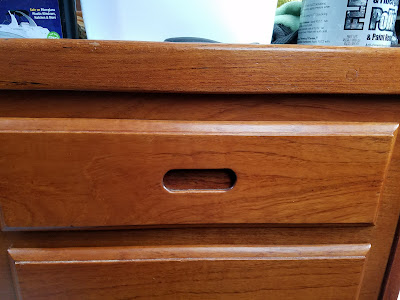
There are many things I love about my Catalina 30, S/V Dulcinea. She sails well, points well, is very roomy and has lots of headroom for example. One thing I wished there was more of was STORAGE! I mean, you can't have too much storage, right? After being on many sailboats, one thing that I noticed on most of them was that THEY had storage behind the settee backs. Mine did not. Perhaps hey didn't think of that back in 1976. here is a picture I took when I had the Galley and seat cushions removed. the areas highlighted in red are prime for new found storage!


Yup! looks like I was right that there was no reason I couldn't create these storage spaces! so, I manned my Dremel Multi-Max and cut the holes to full size. How did I figure out what size they should be? Good old fashioned guesswork... I wanted them big enough to be useful, but they still needed to support the seatbacks.
 |
| Holes cut on the Port Side |
 |
| Holes cut on the Starboard side |
Now I had a problem. I could put stuff in the area I created, but it would just fall down to the area below the seat cushions and there was no bottom. So I had to create one. I started out with cutting some cardboard templates where I wanted the bottoms to be. When I finished the templates looked like this:

I then put the templates on some plywood I had in my workshop and trace around them. Then it was a matter of cutting them out. one side of the piece was fairly easy, regular 90 degree cuts. However, the side that met the hull had to be cut an an angle to match angle of the hull. Since we are talking curved, AND angled cuts, the Band saw attachment for my Shopsmith was the ideal tool for the job....

After I got all of the pieces cut it was time to go back out and install them on the boat. For the most part they fit pretty well. some sanding with my belt sander was needed to do some final shaping so they fit right. You DON'T want a tight fit as this needs to flex a small bit with the hull. I needed a way to temporarily get them into position. After a bit of thought, what came to mind was that old expression "Duct Tape will fix that!" So on the underside I affixed some pieces of tape, and rolled them back lightly on themselves, so once I got the piece in place, I could easily unroll the tape to hold the piece in place.
 |
| Duct Tape in place and Ready to install |
 |
| Duct Tape unrolled and adhered to the hull and sides, holding the piece in place..(the far side is a vertical piece I put in to keep stuff from falling into the engine compartment.) |
Cut a piece of tape to length, then fold in half lengthwise. Put aside.

 |
| Don't even THINK about mixing this stuff without the plungers... get them... they make life MUCH easier! |
 |
| Tape strip laid in, ready for dabbing and squeegeeing... |
 |
| After curing, it is now water proof and solid! |
 |
| Part of the port side storage area... you can see the vertical side I installed at the far end. |
I found that just one coat of epoxy was more than enough strength to support the bottoms.
For the final part of this project, I wanted to find a way to cover the edges of the fiberglass. after much deliberation, I decided to use some cheap vinyl tubing.

I cut the tube lengthwise with a pair of scissors, which was quite challenging, but I eventually got it cut down the entire length.

I laid it out so it grabbed both side of the fiberglass, and went around the opening until it overlapped slightly, then cut it. This worked fairly well, but at times it kept falling in, so I have decided to use some clear silicone to hold it in place.
 |
| starting the edging process with the tube cut down the middle. |
 |
| all the way around with a slight overlap. |
 |
| all done! I realize part if it is pretty crooked, but all I wanted to do was cover up the raw fiberglass edge. this will be covered by the settee cushions anyway. |
I LOVE having all this additional storage. and because of the of the way I attached the seat backs with magnets it is EXTREMELY easy to get to! even with the table in place! Score!!!
Until next time! JEM

One of the best articles that I’ve read in a very long time! I Took notes and surely gonna implement and test bunch of stuff you talked about.
ReplyDeleteYou’re a beast! Cheers, Ash
And don't forget to visit Besttoolsbrand